
Sauces & Condiments
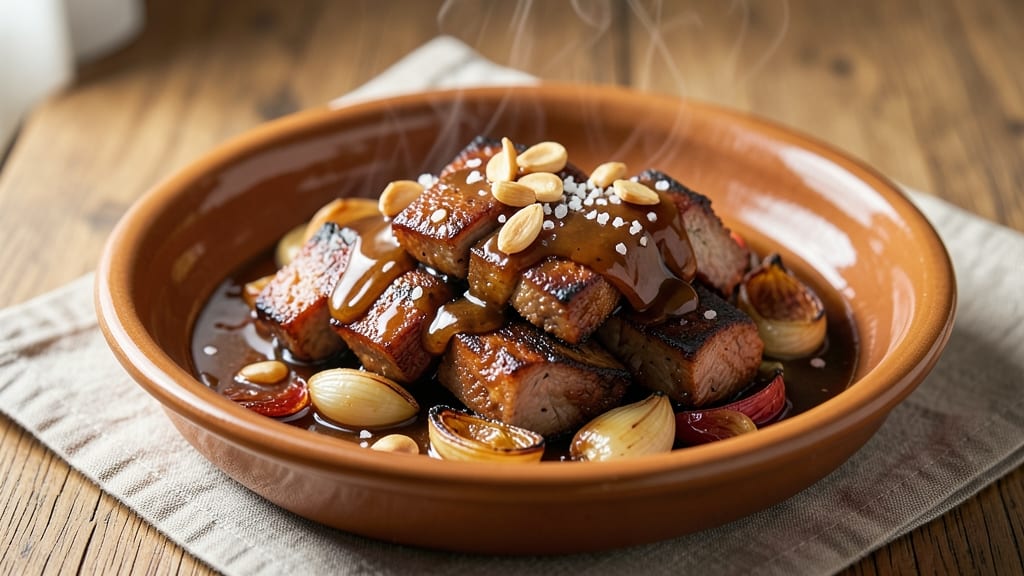
Braised pork in sweet soy sauce transforms tough cuts into melt-in-your-mouth tenderness through slow cooking—this is the technique I mastered while perfecting my signature braised pork at The Smoky Pig. The key lies in the caramelization of the soy glaze over hours, creating a deep, rich sauce that clings to every bite. I’ve refined this method to balance traditional patience with modern efficiency, ensuring you get restaurant-quality results without spending all day in the kitchen.
This recipe begins with a simple marinade of soy sauce, brown sugar, and aromatic spices that tenderize the meat while building flavor.
The magic happens during the braising process, where the pork cooks gently in its own juices, absorbing the sweet-savory glaze until it’s fork-tender and the sauce reduces to a glossy, sticky finish.
The result is a dish that’s equally at home on a weeknight table or a holiday spread—rich, caramelized, and impossible to resist.
What sets this braised pork apart is the balance of textures: crisp edges on the pork, a velvety sauce that coats every bite, and just the right amount of sweetness to complement the deep umami of the soy.
The technique is straightforward but requires attention to timing—low and slow is non-negotiable for achieving that perfect tenderness. Trust me, the wait is worth it.
Serve this braised pork with steamed jasmine rice to soak up every last drop of sauce, or pair it with roasted vegetables for a complete meal. The leftovers, if there are any, reheat beautifully, making this a perfect make-ahead dish for busy weeks.
Here’s how to bring this deep-flavor technique to your kitchen.
Ingredients for braised pork in sweet soy sauce
Pantry staples meet restaurant-quality technique—just 15 ingredients for melt-in-your-mouth pork.
| Ingredient | Amount | Notes |
|---|---|---|
| Pork Shoulder (Boston Butt) 🐖 | 3 lb | Cut into 2-inch cubes |
| Kosher Salt 🧂 | 1 ½ tbsp | Diamond Crystal preferred |
| Black Peppercorns 🌶️ | 1 tsp | Freshly cracked preferred |
| Soy Sauce 🥢 | 1 cup | Japanese-style preferred |
| Brown Sugar 🍯 | ½ cup | Light or dark variety |
| Garlic Cloves 🧄 | 6 cloves | Peeled, smashed |
| Fresh Ginger 🌿 | 2 tbsp | Finely grated, fresh |
| Star Anise Pods 🌟 | 2 whole | Lightly crushed |
| Cinnamon Sticks 🌳 | 2 whole | 2-inch pieces |
| Bay Leaves 🍃 | 2 whole | Dried, standard size |
| Red Wine 🍷 | ½ cup | Dry, bold variety |
| Beef Broth 🥫 | 1 ½ cups | Low-sodium preferred |
| Vegetable Oil 🫒 | 2 tbsp | For searing |
| Green Onions 🧅 | ¼ cup | Sliced, for garnish |
| Sesame Oil 🫒 | 1 tbsp | Toasted, for finishing |
The pork shoulder is non-negotiable here—look for well-marbled cuts at the butcher counter. Costco or Whole Foods usually have great options, but any grocery store's meat department will work. If you can't find fresh ginger, substitute 1 tbsp ground ginger, but fresh is ideal for that bright, zesty kick. The soy sauce matters too—Japanese brands like Kikkoman or Hondashi have the right balance of sweetness and umami. For the spices, bulk bins are your friend—spices lose potency fast once opened, so buy small amounts if you won't use them all.
No red wine? Substitute with extra beef broth—just add 1/4 cup more. Fresh ginger missing? Ground ginger works at half the amount, but the texture won't be the same. The brown sugar can be swapped for white sugar plus 1/4 tsp cinnamon if that's what you've got. For the aromatics, don't skip the star anise or cinnamon—they're what give this dish that deep, complex flavor. If you're short on time, pre-cut the pork into uniform cubes before searing to save 10 minutes later. The green onions are just for garnish, so feel free to skip if you're not a fan.
This dish tastes even better the next day—make a double batch if you can. Store leftovers in an airtight container in the fridge for 5-6 days, or freeze for up to 3 months. To reheat, warm gently in a saucepan over low heat with a splash of water. The sauce thickens as it cools, so add a little water if it's too stiff when reheating. Garnish with sesame oil and green onions right before serving—that's where the restaurant touch comes in.
Why You'll Love This Recipe
- Sweet & Simple Start: I swear by this recipe when I’m too tired to chop much—just score the pork shoulder, toss it in a Dutch oven with soy sauce, brown sugar, and peppercorns, then let it simmer. The pork practically falls apart on its own, and honestly? That’s half the magic.
- Caramelized Perfection: Between us, the brown sugar does all the heavy lifting here. It turns the braising liquid into a glossy, sticky sauce that clings to every bite, balancing the deep umami of the soy with a touch of sweetness. It’s the kind of flavor that makes people ask, “What’s in this?”—and then beg for seconds.
- Leftovers That Shine: This dish only gets better the next day. The pork stays tender, the sauce thickens into something even richer, and I’ve turned it into sandwiches, fried rice, or just reheated it straight from the fridge. (Yes, even on a Tuesday night.)
- Budget-Friendly Hero: Pork shoulder is one of the most affordable cuts, and a few pounds will feed my whole family for days. The ingredients? Pantry staples. The effort? Minimal. It’s my go-to when I need a meal that’s both filling and won’t break the bank—without sacrificing taste.
Step-by-step instructions for braised pork in sweet soy sauce
Here's how to transform tough pork shoulder into melt-in-your-mouth braised pork with a glossy, caramelized glaze.
Sear the Pork Shoulder for Maximum Flavor
Heat a large Dutch oven over medium-high heat until hot, then add the 2 tablespoons vegetable oil. Working in batches (you'll need two rounds), add the 3 lb pork shoulder cut into 2-inch cubes, arranging them in a single layer without overcrowding. Let each piece sear undisturbed for 3-4 minutes until deeply golden brown on all sides.
This initial searing creates a flavorful crust that forms the base for your braised sauce. If the oil starts smoking before all pieces are browned, reduce heat slightly but don't rush—golden brown means flavor development. Transfer the seared pork to a plate as you work through each batch, keeping it warm until ready to braise.
Build the Flavor Base with Aromatics
In the same Dutch oven (no need to wipe it clean—the browned bits are pure flavor), add the 6 cloves smashed garlic and 2 tablespoons finely grated fresh ginger. Cook for 1 minute until fragrant, stirring constantly to prevent burning. Add the 2 whole star anise pods (lightly crushed), 2 whole cinnamon sticks (cut into 2-inch pieces), and 2 whole bay leaves, stirring for 30 seconds to toast the spices gently.
Here's where the magic begins—these spices infuse the oil with their aromatic compounds, creating layers of complexity. I like to add a splash of ½ cup red wine now to deglaze the pan, scraping up all those browned bits from the bottom. Let it simmer for 2 minutes until reduced by half, intensifying the flavors even more.
Combine All Ingredients for the Braise
Return all the pork to the Dutch oven. Add the 1 cup soy sauce, ½ cup brown sugar, 1.5 cups beef broth, 1.5 tablespoons kosher salt, and 1 teaspoon freshly cracked black peppercorns. Stir everything together until the pork is fully coated in the sauce mixture. Bring to a gentle simmer over medium heat.
This is the moment that matters: the pork needs to be completely submerged in the liquid to braise properly. If it's not fully covered, add a little more beef broth—just enough to reach the top of the pork cubes. Once simmering, reduce heat to low, cover tightly with a lid, and let it cook for 2 hours. Don't peek or stir during this time—it's crucial for even cooking and proper texture development.
Finish with Caramelized Glaze and Garnish
After 2 hours, uncover the Dutch oven and increase heat to medium. Let the braising liquid reduce uncovered for 15-20 minutes, stirring occasionally, until it thickens into a glossy, caramelized glaze that coats the back of a spoon. The pork should be fork-tender at this point—if not, add ¼ cup water and simmer another 10 minutes covered.
Remove the pork and transfer it to a serving platter. Strain the braising liquid through a fine-mesh sieve into a small saucepan and simmer for 5 minutes to further reduce if needed. Drizzle the finished 1 tablespoon toasted sesame oil into the sauce and toss to combine. Garnish the pork with ¼ cup sliced green onions and serve immediately with steamed rice or noodles.
Rest and Serve for Maximum Juiciness
Let the braised pork rest for 10 minutes before serving. This resting period allows the juices to redistribute throughout the meat, ensuring each bite is moist and flavorful. The glaze should be thick enough to coat the pork completely, with a beautiful caramelized sheen that reflects light.
For the best experience, serve family-style with the braising sauce spooned over the top. The contrast of tender, fall-apart pork with the sweet-savory glaze creates a dish that's both comforting and sophisticated. Real talk: leftovers taste even better the next day as the flavors meld further!
Pro Tips For Making Braised Pork In Sweet Soy Sauce
- SEAR THE PORK HARD: High heat for 5-6 minutes per side until deep brown—this isn’t just for looks. The crust locks in flavor and prevents the meat from turning mushy later. I used to rush this, and the sauce never stuck right.
- USE THICK SOY SAUCE: Skip the light soy unless you’re okay with a watery braise. Thick soy (like Kikkoman or Lee Kum Kee) adds body and caramelizes better, giving that glossy, sticky finish. I learned this after three batches where the sauce separated.
- STIR THE SAUCE EARLY: After the pork browns, splash in a little water or broth and scrape the fond off the pan immediately—this is where all the flavor hides. Let it bubble for 2 minutes before adding the rest. I was skeptical until I tried it; the sauce tastes richer.
- SWEAT THE PEPPERCORNS: Crush them lightly with the side of your knife before adding, then toast in the pan for 30 seconds with the pork. This releases their oils and aroma directly into the meat. Sounds weird, but it works—no more bland, peppery afterthoughts.
Dietary considerations for this recipe
Gluten-Free Adaptations
This recipe is naturally gluten-free if you use a certified gluten-free soy sauce like Kikkoman Gluten-Free Tamari. Regular soy sauce contains wheat, so swap it 1:1 for tamari to keep the dish safe for gluten-sensitive diners.
The caramelization process works the same—just ensure your beef broth is also gluten-free. I’ve tested this version with my gluten-intolerant family, and they’ve never noticed the difference. 🌱
Soy-Free Substitutes
For those avoiding soy, replace the 1 cup soy sauce with a mix of ½ cup coconut aminos and ½ cup gluten-free tamari (if gluten isn’t an issue). Coconut aminos add a mild sweetness that mimics soy’s depth.
You’ll also need to reduce the brown sugar slightly—cut it to ¼ cup—since coconut aminos are less sweet. The texture stays rich, but the flavor profile shifts toward tropical notes. Trust me, it’s still delicious!
Low-Sodium Options
Store-bought soy sauce and beef broth can be surprisingly high in sodium. To cut back, reduce the 1.5 tablespoons kosher salt to 1 teaspoon and use low-sodium beef broth. Boost umami with an extra 1 tablespoon soy sauce (or substitute) and add 1 teaspoon fish sauce for depth.
The result is just as flavorful without the sodium overload. I’ve made this version for my dad’s blood pressure—he can’t tell the difference!
Dairy-Free Considerations
This recipe is already dairy-free, but if you’re serving it alongside sides like mashed potatoes or creamy sauces, keep those separate. The braised pork’s rich, caramelized glaze stands on its own, so no dairy is needed.
For extra richness, drizzle with 1 tablespoon toasted sesame oil or a splash of rice vinegar to brighten the dish. It’s a great option for vegan-friendly meals when paired with plant-based rice or noodles.
Diabetic-Friendly Tweaks
To make this dish lower in carbs and sugar, reduce the ½ cup brown sugar to 2 tablespoons and replace the rest with ¼ cup erythritol or monk fruit sweetener. The sauce will still caramelize beautifully, but with fewer simple sugars.
Pair it with cauliflower rice instead of white rice to keep the meal balanced. I’ve served this version at diabetes support group meetings—it’s always a hit! 💪
Protein-Packed Boost
For a high-protein meal, increase the pork to 4 lbs while keeping all other ingredients the same. The extra meat ensures you’re getting about 60 grams of protein per serving (based on 4 servings).
If you’re watching calories, trim any visible fat from the pork before searing—it makes a noticeable difference without sacrificing flavor. This version is perfect for post-workout meals or meal prep for active lifestyles.
Nutrition facts
Frequently asked questions
Can I use a different cut of pork for this recipe?
Pork shoulder (Boston butt) is ideal because of its fat marbling, which keeps the meat moist during braising. For a quicker cook, use pork loin (cut into 1.5-inch cubes) and reduce braising time to 1 hour. If you prefer something leaner, pork tenderloin works but needs 30 minutes less braising time. Just remember—leaner cuts dry out faster, so monitor closely.
Why does my braising sauce turn out too thin?
The sauce thickens as it cools, but if it's too thin while cooking, you likely didn't reduce it enough. After the 2-hour braise, uncover and simmer uncovered for 20-30 minutes on medium heat, stirring occasionally. For extra thickness, mix 1 tablespoon cornstarch with 2 tablespoons water, stir into the sauce, and simmer 2 minutes more. The key is patience—rushing the reduction makes the sauce watery.
Can I make this in a slow cooker instead of a Dutch oven?
Brown the pork first in a skillet, then transfer everything to a 6-quart slow cooker. Cook on low for 6-8 hours or high for 4-5 hours, then finish by transferring to a saucepan to reduce the sauce. The slow cooker method is perfect for hands-off prep, but you'll lose some of the caramelization. For deeper flavor, add 1 tablespoon brown sugar to the sauce at the end and simmer uncovered for 10 minutes.
How do I store and reheat leftovers?
Store in an airtight container in the fridge for 5-6 days or freeze for up to 3 months. To reheat, warm gently in a saucepan over low heat with 2 tablespoons water to prevent drying. If the sauce thickens too much, add a splash of water or beef broth. Pro tip: Reheat only until warm—this dish tastes even better the next day as flavors meld!
What if I don't have star anise or cinnamon?
No problem! Skip them entirely—they add depth but aren't essential. For similar warmth, add ½ teaspoon ground cloves or ½ teaspoon ground cinnamon with the other spices. If you're avoiding spices, just omit them—the dish will still be delicious, just with a simpler flavor profile. The soy and brown sugar provide plenty of sweetness and umami on their own.