
Main Courses
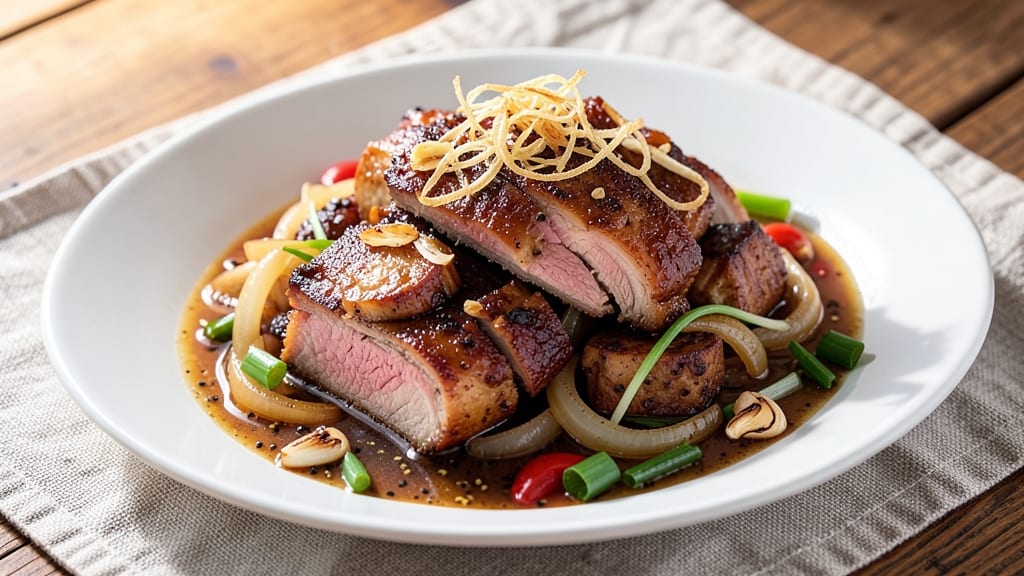
This Filipino-style braised pork transforms tough cuts into melt-in-your-mouth tenderness through a slow-simmered process that unlocks deep, savory flavors. The secret lies in a balanced sauce of soy sauce, vinegar, and garlic—classic Filipino staples that create a rich, slightly tangy base.
I first tasted this dish at a family gathering in Manila, where it was served with steamed rice and crisp atchara, and it's been my go-to comfort meal ever since.
The magic happens over 1.5 to 2 hours of gentle cooking, where the pork absorbs the aromatic sauce while staying juicy and flavorful. Unlike other braised dishes, this recipe relies on simple ingredients—no fancy techniques required—just patience and attention to balance.
The celery crown garnish isn't just decorative; it adds a fresh, crunchy contrast that cuts through the richness of the pork.
By the time you serve this dish, you'll have a table full of satisfied eaters—tender pork with a glossy sauce, paired perfectly with steamed rice or garlic fried rice.
The aroma alone will have everyone gathering around, and the first bite delivers that perfect combination of savory, slightly sweet, and tangy. This is the kind of meal that feels like home, no matter where you are.
Serve with sautéed greens or extra atchara for brightness, and save leftovers for even better flavor the next day. The sauce thickens as it cools, making every bite even more satisfying. Let's get cooking!
Ingredients for braised pork recipe filipino style
Classic Filipino flavors plus a few pantry staples—this is comfort food at its best.
| Ingredient | Amount | Notes |
|---|---|---|
| Pork Shoulder 🥩 | 2 lb | Bone-in for flavor, cut into 2-inch cubes |
| Soy Sauce 🍶 | ½ cup | High-quality, like Kikkoman or Silver Swan |
| White Vinegar 💧 | ¼ cup | White or cane vinegar, not apple cider |
| Garlic Cloves 🧄 | 8 cloves | Peeled, smashed for maximum flavor |
| Onion 🧅 | 1 whole | Yellow or red, sliced into half-moons |
| Brown Sugar 🍯 | ¼ cup | Light or dark, packed measurement |
| Potatoes 🥔 | 2 medium | Russet or Yukon Gold, peeled and cubed |
| Carrots 🥕 | 3 whole | Baby or regular, sliced into thick rounds |
| Celery Stalks 🧅 | 3 whole | For garnish, cut into thin strips |
| Bay Leaves 🌿 | 2 whole | Dried, removed before serving |
| Black Peppercorns 🌶️ | 1 tsp | Crushed, for depth of flavor |
| Salt 🧂 | 1 ½ tsp | Kosher or sea salt, adjust to taste |
| Vegetable Oil 🫒 | 2 tbsp | For searing pork, high smoke point |
| Water 💧 | 1 ½ cups | Or substitute with pork broth |
| Green Onions 🧅 | 2 whole | For garnish, chopped into 1-inch pieces |
The pork shoulder is the star here—bone-in, not lean. Look for it in the meat section at Costco or your local butcher shop, where it's usually cheaper per pound. If you can't find bone-in, pork butt works too. The potatoes and carrots should be firm and free of soft spots; Yukon Gold potatoes hold up better than reds in long cooking. For the vinegar, Silver Swan or Heinz are reliable brands, but any white vinegar will do. The celery crown garnish is non-negotiable—it adds that fresh crunch that balances the rich sauce.
No soy sauce? Coconut aminos is the closest substitute, though the flavor will be slightly different. Running out of vinegar? Lemon juice at double the amount works in a pinch. Want to skip the potatoes? Sweet potatoes or extra carrots keep the dish hearty. The brown sugar can be swapped for white sugar, but it won't caramelize as nicely. For the garlic, fresh is a must—jarred garlic lacks the punch. If you're using pre-cut garlic, smash the cloves first to release more flavor. The celery for garnish? Save the ends for stock—nothing goes to waste in Filipino cooking.
This dish tastes even better the next day, so make extra. Store leftovers in the fridge for 4-5 days or freeze for 3 months. Reheat gently on the stove with a splash of water to keep the sauce glossy. For the celery crown, keep it separate until serving—it wilts fast. If you're prepping ahead, par-cook the pork and finish it later; the sauce can be made a day in advance and reheated. The aroma alone will have your whole house gathering around the table.
Why You'll Love This Recipe
- One-Pot Magic: I swear by this—no fancy gadgets, just a deep pan and 10 minutes of prep. The pork shoulder practically cooks itself while you chop onions and garlic, and the vinegar cuts through the richness like a breath of fresh air.
- Umami Bomb: That soy sauce and garlic combo? It’s like a flavor grenade in the best way. The pork ends up tender with a glossy sheen, and the vinegar gives it this bright, tangy kick that makes every bite satisfying. (Yes, even on a Tuesday night.)
- Leftovers That Win: Between us, this dish tastes better the next day. I make a double batch on Sundays, and by Wednesday, it’s my go-to for quick lunches—just reheat with a splash of water, and it’s like it was just braised.
- Budget Hero: Pork shoulder’s affordable, and a single cut feeds my family for days. The soy and vinegar stretch the flavor without breaking the bank, and honestly? It’s the kind of meal that makes grocery day feel like a victory.
Step-by-step instructions for Filipino-style braised pork
Here's how to create tender, flavorful pork shoulder with a rich sauce and crisp celery garnish.
Sear the Pork Shoulder for Deep Flavor
Heat the 2 tablespoons vegetable oil in a large Dutch oven over medium-high heat until shimmering. Pat the 2 lb pork shoulder dry with paper towels and season generously with 1.5 teaspoons salt and 1 teaspoon crushed black peppercorns. Working in batches if needed, add the pork shoulder to the pot and sear for 4-5 minutes per side until deeply browned.
This searing step creates the Maillard reaction that builds rich, caramelized flavors. Don't rush it—you'll know it's ready when the pork releases easily from the pan and has a deep golden-brown crust. Remove the pork and set it aside on a plate.
Build the Braising Base with Aromatics
In the same Dutch oven, add the 1 whole onion sliced into half-moons, 8 smashed garlic cloves, and cook for 3-4 minutes until softened and fragrant. Stir in the 0.5 cup soy sauce and 0.25 cup white vinegar, scraping up any browned bits from the bottom of the pot.
The vinegar will bubble vigorously—this is normal. Let it cook for 1 minute to allow the flavors to meld together. This aromatic base forms the flavor foundation for your braised pork.
Simmer the Pork with Vegetables and Seasonings
Return the seared pork shoulder to the Dutch oven. Add the 2 medium potatoes cubed, 3 whole carrots sliced into thick rounds, 0.25 cup brown sugar, 2 whole bay leaves, and 1.5 cups water. Bring to a gentle simmer over medium-low heat.
Cover the pot and let it cook for 1 hour and 15 minutes, turning the pork occasionally. You're looking for the pork to become fork-tender and the vegetables to be easily pierced with a fork. The sauce should reduce slightly but still coat the vegetables.
Finish with Celery Crown Garnish
Remove the 2 whole bay leaves from the braise. Cut the 3 whole celery stalks into thin strips and arrange them in a decorative crown pattern on top of the pork. Garnish with the 2 whole green onions chopped into 1-inch pieces.
Let the braised pork rest for 10 minutes before serving. This resting time allows the juices to redistribute throughout the meat, ensuring each bite is moist and flavorful. Serve the pork with the vegetables and their rich sauce spooned over the top.
Pro Tips For Making Braised Pork Recipe Filipino Style
- SEAR THE PORK FIRST: Don’t skip browning the pork shoulder—this isn’t just for flavor, it’s for texture. Use a heavy pan (cast iron if you’ve got it) and cook the meat in small batches over medium-high heat until deep golden brown on all sides. I learned this the hard way when my first batch tasted flat because I rushed it.
- MINCE THAT GARLIC: Chop those garlic cloves into tiny, almost paste-like bits—no big chunks. Filipino braised pork relies on that deep, aromatic punch, and finely minced garlic melts into the sauce instead of sitting as a chewy afterthought. Use a knife or pulse it quickly in a food processor (but don’t overdo it).
- CONTROL THE VINEGAR: Add the white vinegar after the pork is mostly cooked, not at the start. Dumping it early will turn your sauce sour and watery. Instead, let the pork simmer in the soy sauce and aromatics until tender, then stir in the vinegar just to brighten the flavors at the end—like a wake-up call for the dish.
- USE LESS SOY SAUCE: Start with half the amount of soy sauce the recipe calls for. You can always add more later, but you can’t un-salt it. Taste as you go—Filipino braised pork should be savory, not salty enough to make you reach for water. (Yes, even if you’re used to salty dishes, this one’s different.)
Troubleshooting great braised pork recipe filipino style
Pork Not Tender Enough
If your pork shoulder feels tough after braising, you likely didn't cook it long enough. The magic happens at 200°F internal temperature—use a meat thermometer to check.
If you cut into it and it's still fibrous, return it to the pot with ½ cup extra water and simmer 30-45 more minutes. I've found bone-in cuts take 10-15 extra minutes to reach the same tenderness as boneless. 💡
Sauce Too Thin or Watery
A thin sauce usually means too much liquid was added. If this happens, remove the lid and simmer uncovered for 10-15 minutes to reduce the sauce naturally. For extra thickness, mix 1 tablespoon cornstarch with 2 tablespoons cold water, stir into the sauce, and simmer 2 more minutes.
I always keep an eye on the sauce level after 1 hour of cooking—if it's already reduced too much, add ¼ cup water early to prevent sticking.
Burnt Onions or Garlic
Burnt aromatics create bitter flavors that ruin the dish. To prevent this, keep your heat at medium-low when cooking onions and garlic—never high heat. If they do burn, remove them immediately and start fresh with fresh aromatics.
For extra insurance, I sauté onions first for 3 minutes before adding garlic, which helps prevent burning. 🌶️
Celery Crown Wilting Too Fast
Fresh celery garnish should stay crisp, not soggy. The key is adding it only in the final 10 minutes of resting time. If you're prepping ahead, store the celery crown separately in a sealed container with a damp paper towel.
For extra crunch, I sometimes dip the celery strips in ice water for 30 seconds before arranging them on top—this helps maintain crispness. 🥬
Vinegar Overpowering
Too much vinegar creates an unbalanced tang. If your sauce tastes harsh, balance it with 1 teaspoon brown sugar or ½ teaspoon soy sauce to mellow the acidity. For future batches, start with ¼ cup vinegar and taste as you go—Filipino cooking relies on balance, so adjust gradually.
I always make a small test batch first when experimenting with vinegar amounts. 💛
Pork Too Dry After Cooking
Overcooking or skipping the resting time causes dry pork. Always rest the pork for 10 minutes before serving—this lets juices redistribute. If it's still dry, try braising with ½ cup less water next time and adding 1 tablespoon coconut milk to the sauce for moisture.
I've also had success wrapping the pork in butcher paper during the last 30 minutes of cooking to lock in juices. 💪
Nutrition facts
Frequently asked questions
Why does this Filipino-style braised pork need to simmer so long?
The long 1.5 to 2 hours simmering time is key to tenderizing the pork shoulder. This cut contains tough connective tissues that break down slowly in the liquid, creating melt-in-your-mouth texture. The combination of soy sauce, vinegar, and garlic also infuses the meat deeply during this time, building layers of flavor that can't be achieved with quick cooking methods.
Can I use a different cut of pork for this recipe?
While pork shoulder works best, you can substitute with pork butt or even pork loin (though it'll be leaner and less forgiving). For tougher cuts like pork shank, increase the cooking time by 30-45 minutes. Avoid using pork tenderloin—it's too delicate and will dry out during the braising process.
What's the best way to make this dish ahead of time?
This recipe actually tastes better the next day! Cook the pork and sauce completely, then refrigerate for 24 hours to let flavors meld. The sauce will thicken naturally. Reheat gently on the stove with a splash of water, and add the celery crown just before serving to keep it crisp. For freezing, store for up to 3 months—thaw overnight in the fridge before reheating.
How can I adjust the sauce to be less sweet or tangy?
For less sweetness, reduce the brown sugar to 2 tablespoons and add 1 teaspoon fish sauce for umami depth. For less tang, decrease the vinegar to 2 tablespoons and add 1 teaspoon soy sauce to balance. Filipino cooking relies on balance—always taste as you go and adjust gradually. The key is finding harmony between all the flavors.
What sides pair best with this Filipino braised pork?
Classic pairings include steamed white rice (the perfect neutral base), garlic fried rice, or sautéed string beans. For extra brightness, serve with atchara (pickled papaya) or a simple green salad. The rich, savory pork also works well with hearty sides like mashed potatoes or roasted sweet potatoes to soak up the delicious sauce.